I think I'm going to have title pictures for now on. It seems like a nice addition :3 So, I had absolutely no ideas, so why not make a tutorial?
First things first... if you have a mac, get gimp. And go to some other tutorial 'cause I don't have gimp yet and it makes me sad :(
But, if you have a Windows, then go get Paint.NET if you don't already have it. It is 100% free and amazing. Click here and go download + install. Just follow all the instructions, it should be pretty straightforward.
Next, decide what you want to make a gif of. I will be making something fairly simple since this is a tutorial. I will be making... *insert drumroll* bubbles! Just simple bubbles floating up and popping.
Open up Paint.NET. You will start out with the standard image (800x600). If you want to have this size for your gif, keep it. With whatever you're doing, just choose the size you want. If this is your first time making a gif, I suggest starting with something simple and small. My size is 20x40
(Zoomed in at 1600%)
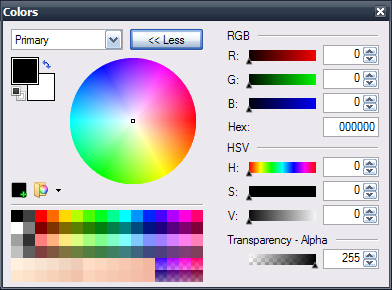
Next, I'm going to open up my color panel:
So it will look like so:
You see the "Transparency - Alpha" in the right bottom corner? Move it all the way to 0 so you can make the background transparent. Once you have your color transparent, press F (shortcut) to get the bucket, and click on your picture to make it transparent. If you did it correctly, it should look like this:
Now, start drawing what you want the very first part of your gif to look like. Since I'm doing bubbles I ended up going with this as my first picture:
Now, save your first picture and name it something you'll know is the first part of your gif. Save it as a .png. I suggest something simple like, "gif1.png".
Next, open up Paint.NET again, repeat the process, (make sure your second picture is the same size as your first) and depending on what gif you're making, make the second part of what you want your gif to be. So I will be making a second bubble. Result of second picture:
Save this as whatever your first was named only add a 2 at the end. So I named mine gif2.png. Continue repeating this process until you have all the pictures you want for your gif.
Next, go to a Gif maker. I suggest using gifmaker.me because you can change the order of the images if you accidentally upload them in wrong order, to the side you can see what it will look like once you make it, you can change the size, speed, and can even add music. There's lots of nice customization so I always use it to create my gifs once I make the pics. (I suggest doing 100% so it looks the best.)
Warning: If you do any size different from 100%, the background will turn white and will no longer be transparent.
And this is the outcome of mine!
Yes, it looks blurry because I enlarged it on here and it is originally like this:
So, there you go xD Obviously, this super small size is recommended if this is your first time doing it :3 I know today was kinda lame, but hopefully I'll have some stories for tomorrow!- Sophie ♥
P.S. Be sure to check images for hover-text!


0 comments:
Post a Comment